Granny Square Slippers – August 2016

A long time ago, before I had gone over to the crochet dark side, I’d seen this pattern for slippers made from humble granny squares. It immediately went on my “things to do” list but languished towards the bottom as other projects stole my attention. I finally got round to starting them some years later. There were complications from the start; they were using super chunky yarn, I only had chunky weight so I compensated by adding an extra round on each square but ended up with slippers so big that they fitted my husband’s size 11 feet! He did model them for me but wasn’t too keen – too out there for him I think!

So I unpicked and started again. One less round meant that the squares were too small so I compromised by doing htr instead of tr in the final round. They’re a totally scrappy project, I used the ends of four different balls of yarn yet I feel they have a slightly Arabian look and they get the job done – toasty toes all round!


Pattern: Mollie Makes Issue 19
Yarn: Sirdar Folksong in Flower Power 381 (sadly discontinued now – I only bought one ball because it was pretty so I’m glad to have found a use for it!), My Boshi in Lime and various bits of navy and bottle green yarn!

Seaside Amigurumi – July 2016

I love narwhals, now I know they’re pretty cool right now (unicorns of the sea and all that) but I really do love the beauty of these mysterious tusked whales (Monodon Monoceros – one tooth, one horn). And with that slight obsession in mind, the Mollie Makes mermaid themed amigurumi set was one of those projects that I pretty much had to abandon everything else to do. First up was a pair of narwhals, one in silvery grey and one in teal. I used silver DMC embroidery thread for the horns, beads for the eyes and embroidered smiles. Quick to make and incredibly cute!

Next I went on to the mermaid. It was a pretty straightforward design although I’m not convinced I did the crab stitch row, which was meant to delineate the body and tail sections, entirely correctly. I used a variegated Baby Crofter yarn in shades of white, purple and pink along with some berry coloured DMC cotton for the hair. I loved the way the colours worked together although the whole process was a bit long-winded – you had to make a kind of skull-cap then weave the lengths of hair along a central parting before attaching it all to the head. All in all very successful though!

20160720_080451 (2)
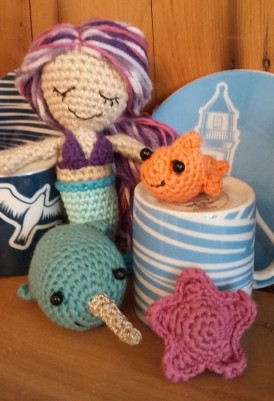
A tiny fish and a tiny star followed and then my son demanded a merman of his own! I followed the same design as I had for the mermaid but adapted the hair, again using variegated Crofter yarn but this time pulling loops through the skull-cap piece and cutting the knotted ends to create little tufts spiraling out from the centre. I love the set and I was really pleased with how they all turned out.

I do love the sea and going to the beach – maybe something to do with my childhood in the dead centre of England where going to the seaside was an incredibly exciting adventure – maybe one day I’ll move to the coast but until then I’ll continue to fill my home with seaside themed bits and bobs and paraphenalia!

20160728_223733 (2)

Pattern: Mollie Makes Issue 68

Yarn Used: DMC Natura Cotton in Glacier, Gris Argent, Saran and Amaranto, King Cole Bamboo Cotton in Pale Green Mint, Peacock and Aubergine, Sirdar Snuggly Baby Crofter in Georgie and Sirdar Crofter in Wild Thyme

Simple Wristwarmers – June 2016

I’ve pretty much always worked in old buildings or in buildings where on occasion (perhaps every winter) the central heating system stops working. Beautiful buildings with gorgeous tiled floors, massive marble fireplaces and wood panelling… and single glazed windows that can’t be replaced due to the cost of updating a listed building. I have found that over the years, a pair of fingerless mittens have become invaluable – a way of keeping warm while still being able to work at a computer. It was with the problem in mind that I decided to make a quick pair of wristwarmers for a friend and colleague who often finds herself cold and frustrated when the decrepid office boiler breaks down again and the wait for an engineer will be another three days while they order a new part – you get the picture!

20160701_095617I knew she was a fan of green so went for a bright MyBoshi chunky yarn. The fact that there’s some wool in the make up means that the mittens were warm and the stitch definition was good. MyBoshi is also very squashy which makes me happy! The design was adapted from the owl mittens that I made for myself a few years back although minus the owls. The finished products were functional with a bit of fun (thanks lime green yarn!)


Yarn Used: DMC MyBoshi in Lime (shade 121)

Decorated Shopping Bag – June 2016

When my previous manager and mentor announced she was leaving I knew I had to make something to show my appreciation and thank her for all the support and guidance she had given me. I have now (January 2018) been doing my current job for nearly two years but prior to that, anxiety and an acute fear of failure meant that I stayed in a “temporary” job for 8 years because it was comfortable and I was good at it. This lady helped me take the plunge, be brave and work towards achieving my potential.

The item I chose to customise for her leaving gift was a jute shopping bag – reusable shopping bags for the win! I still had a few crochet roses left over from a previous experiment so finished off the rest of the colours in a pack of Lion Brand Bonbons – there are loads of different colourways, the one I used is full of neons and beautiful brights. I’d been planning to crochet a rose in each of the eight colours for ages but never managed to get all of them finished at once before they got pinched for other projects. The pattern I used was a very simple one – you crochet a long undulating strip which is rolled up and stitched into a spiral. I did have to make some of the flowers slightly smaller – yarn previously used for other projects and all that… I combined the flowers with a monogrammed applique patch in cotton fabric and felt. I loved the end result – very bright and cheerful!

DSC_0659Materials: Jute Bag from Hobbycraft, Lion Brand Bonbons yarn pack in Crayons, Pattern from Summer Homestyle pull out from Mollie Makes Issue 40

Plarn Nesting Baskets – June 2016

A few years ago, I spent a lovely day at my local agricultural show (Bingley Show – one of the largest single day events in the North). It was fascinating to see all the different animals on display from the tiny ‘fancy’ mice to the enormous show bulls via cats, hens, goats and everything in between. The show also has a whole load of traditional attractions – fruit and vegetable contests, flower arranging and my personal favourite, handicrafts. There were so many different categories and I made a promise to myself to enter. I was particularly spurred on when it became apparent that some of the categories only had three entries and furthermore all of the entries had been made by the same person, guaranteeing them all the rosettes!

So in June 2016, I downloaded my entry form from the show’s website and set to work. One of the categories was an upcycled item and what could be a better example of upcycling than reusing disposable plastic bags to make practical and functional storage baskets from plarn. You may have realised from earlier posts that I love plarn and I love making baskets so combining the multitude of coloured bags available, I created three rainbow striped baskets that fitted snugly inside each other. Standard crochet basket pattern, flat circle to start, line of dc into the back loops only to begin the side of each basket then carry on until they reach the desired height.

I was pretty happy with the end result – the rainbow lacked purple, I wasn’t able to find a suitable bag but I felt that the baskets hit the brief. It was only then that I read the small print. I hadn’t checked the dates and unfortunately we were on holiday for the day of the show. To enter, you have to present your items on the morning of the show and remove them at the end – no exceptions. After all my work and planning I couldn’t take part! Nevermind, there’s always next year!

As I type this (June 2017) I have downloaded the 2017 entry form – just need to check my dates properly this time!

2nd Birthday Card – May 2016

My son loves cows. Not just a little bit – it’s bordering on obssession. In a way I feel partially responsible. My parents have a holiday home in Normandy, France. It’s a converted farm house and is adjacent to a working dairy farm. The President lorry turns up once a week to collect the milk to turn it into camembert – it’s all very lovely! However, we visited for a few weeks in August 2015 when he was just over a year old and it all began from there! Everytime my son was restless or upset or needing calming down we took him to see the cows and he became captivated by the majesty of these gentle giants. So it made sense that his 2nd birthday card would be cow themed!


Embroidery and applique again and very similar to the one I made for my daughter a few months earlier – hey, if something works and all that! It’s a very simple design but an effective one. The fabric in the background was from a local stationery shop who were selling fat quarters for £1.00 – I think this was designed as a Christmas fabric but I really liked the geometric pattern. Although I always say it, I do like embroidery but only ever seem to do it for birthday cards – I really must make the effort to do more!

Crochet Pincushion – May 2016

I’ll warn you now, this is an odd one! I’d never really considered pincushions or their usefulness until I decided to make one. I got a free kit with Issue 66 of Mollie Makes – they called it retro style, I saw the opportunity to try out some of the floral designs that can be created with variations of the basic fan pattern. I loved the colours, very on-trend watermelon shades (pinks and greens) although I ran out of the dark pink and the green towards the end so had to improvise with some spare grass coloured cotton DK. I made a second one in blue and purple as a gift for my Mum.

Pincushions are really useful! Until I’d finished making this one, I don’t think I’ve ever used one before! I keep my pins in a recycled tiny jam jar and generally used the arms of the sofa or the chair cushions (as long as my husband didn’t see me!) while I was working on embroidery or pinning together limbs for woollen creatures but no more! At some point when I forget all the previous blankets and the time they take, I’d love to use this pentagon pattern to make something lovely for myself – maybe a bigger, non-pin cushion may be a more achievable goal though!

The Big Reveal – January 2017

It’s been so long since I’ve written anything here that it’s become a “thing”. A niggle at the back of my mind of something that I should be doing but I’ve got out of the habit. One of the benefits of the Cliff challenge, that I hadn’t really given the whole thing credit for, was the focus it gave me and the momentum it provided to make me share – sharing my trials and tribulations and also my achievements. I haven’t stopped crafting, I make something almost everyday,but the recording bit has got lost somewhere so I’ll start my 2017 here and now with the big reveal of all the Cliff makes!
Due to holidays and commitments of extended family, we were really lucky to have three Christmas celebrations (complete with full Christmas dinners) – the final one of these was with my brother-in-law in January. For anyone who may have missed earlier posts, as a running joke with my husband’s family, I have been the long-suffering recipient of numerous Cliff Richard calendars over the past several years. In 2016, I decided to get my revenge!


And so as part of the after dinner entertainment, my brother-in-law was presented with the 12 Cliffs of Christmas. I’d wrapped and labelled each one with a hand-made gift tag – it was almost sad to say goodbye to the collection that I’d put so much time and effort into but it was worth it! I think the most successful piece was probably the jewellery made from rolled strips of calendar. The most challenging piece was the sonobe origami vase or perhaps the unsuccessful attempt at spinning paper into something able to be woven. I think I actually miss the challenge although I’m grateful that I don’t have to look at as much tanned and leathery old man skin – but I digress!


He took it well. I would describe his reaction as a mixture of confusion, amusement and mild astonishment and I’m relatively confident that there will be no more calendars – at least this should act as a deterrent!

Yarn Spinning – May 2016 and January 2017

You may recall that I bought a spindle with the intention of trying to spin paper into some kind of weavable material (May 2016 Cliff Craft Challenge). The words, straw, gold and Rumplestiltkin come to mind – some people may be able to spin paper into yarn but those people, I conclude, must be wizards! After abandoning my initial dream, I opted for the safer, more traditional method of spinning mohair wool tops into yarn. I used wool tops from a mixed colour Moorland themed bag that I’d bought from Texere as needlefelting supplies – lovely soft fluff in greens, blues and browns.
dsc_0158
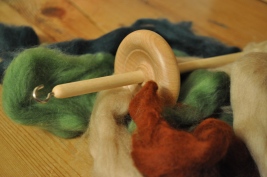
Trusty YouTube videos helped me to get started and off I went. I have a drop spindle (as opposed to a Sleeping Beauty style spinning wheel) so the idea is that you charge a leader with twist, then let that twist travel up the fibres, spinning then together. Once I got going, after more than a few false starts, I got quite into it. It’s quite hypnotic and I got a bit carried away with the rhythm and motion of it all.
Getting the twisted fluff off the spindle was another matter entirely and it’s taken me over 6 months (and getting to the start of this project in the process of getting up to date, blog-wise) to pluck up the courage to actually attempt it. So again, following a YouTube video, I wound the yarn (!) into a skein, dunked it in warm water and it’s currently weighted down over a door handle to block.
As I may have mentioned, spinning is addictive so I made an additional skein in pale blue with yellow and hot pink flourishes. There won’t be a lot of yarn so I’m thinking of using what I’ve made to crochet / knit some flowers for a brooch.
The yarn itself is interesting. I’m much more used to using plied yarn so my yarn is single ply but because I’m a proper novice it’s very varied in its thickness and some parts are much more closely twisted than others. I’ve started crocheting with the green yarn using a 3mm hook. It looks OK and I’m looking forward to improving my skills – it’ll take me a while to get to full wizard spinning status but I’m sure it will be good fun getting there!

Video used: Basic Drop Spindle Tutorial – https://www.youtube.com/watch?v=7R0Lb1qA7kE